
Create and send your first Contact form with WPForms. In this video we demonstrate how to create and send your first contact form with WPForms. You can download WPForms from .

Once on the site, just click on the Get WPForms Now button. Once downloaded, go to the dashboard of your WordPress site, down to the plug-in section, and then hit the add new plug-in button. Then click on the upload plug-in button, drag your downloaded WPForms zip file to the choose file area. Once it is there hit the install now button. When the plug-in has finished installing hit the activate button.

Now that the plug-in has been installed you will see a WPForms entry in the dashboard menu. Click on that to start creating your first form. You will be presented with a screen where you can name your first form. Here it will also give you an option to use one of the simple templates that they have provided to get you going quickly. For our example today we are going to click on the simple contact form button. This will take us to a new screen and insert a simple contact form, that includes name, email, message and a submit button.

You will notice a panel on the left-hand side named add fields. Here we have many different types of fields that you can simply left click on and drag to the appropriate area of your contact form. To edit a field in the form area, just left click on it and it will open up the field options for you.

You can give your field a name, a type, and also decide if it should be required or not. Below the required checkbooks we have the advanced options. Here you can set the size of the field, add a placeholder that will appear within the field, and choose whether to hide the label. You can also assign it a CSS class here.

You can give your field a name, a type, and also decide if it should be required or not. Below the required checkbooks we have the advanced options. Here you can set the size of the field, add a placeholder that will appear within the field, and choose whether to hide the label. You can also assign it a CSS class here.


Once your form is complete to your satisfaction, move down to the settings tab, this is on the icon list on the left-hand side. You can change any of the general details, such as the form name, description, and what the submit button should say. Below the general options you will see a tab named notifications. Click on it. Here we can set the send to email address, this is the email address that the form will be sent to once it is filled out and submitted. Below that, you can set the email subject, and who the form is from. You have options to enter the from email address, and also the reply to email address.
Below the notifications tab you will find the confirmations tab. This is where you can enter your message text, to be displayed when a visitor fills out and submits the form. Once you have done this your form is complete and ready to send.


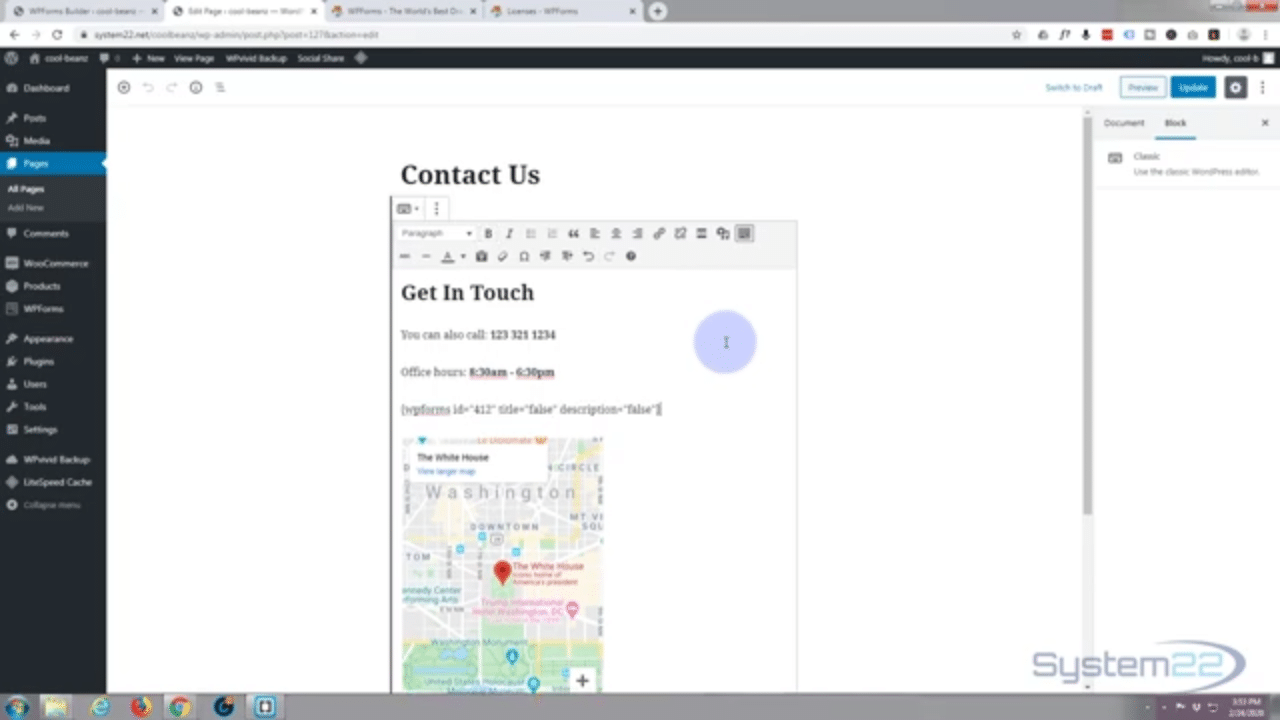
Now it’s time to copy the code and embed the form in one of your pages. This is a really simple process. Just left click on the embed button at the top on the right-hand side, this will trigger a pop up that contains the shortcode you need to embed in your page. Copy the shortcode and create a new page, or go to the page where you wish to insert the form. When you are in the page, simply paste the short code where you wish the form to appear. Save the page and view it. Your new form should appear where you pasted the shortcode. As long as your site is live online, you can fill out the form and send it. Immediately after the send, you should see the confirmation message that you put in earlier, stating that the form has been sent. Presuming you sent it to your own email address as a test, go to your email client to check that you have received it. Like most emails it may take a minute or two to come through. Congratulations, that is how easy it is to create and send your first Contact form with WPForms.


For our readers, get any of the below courses for just $9.99 each. Just contact me with the course name and I’ll email you the discount coupon.